
This article explains how to prepare, configure, start, and update WebReports in Docker. A Docker image packages WebReports and its .NET runtime. A container is an instance created from that image. WebReports still needs its own application database, license settings, HTTPS certificate, and storage for files that must survive container replacement.
Use Docker when your deployment is managed as containers.
Start with WebReports Deployment Requirements and Network Architecture for application sizing, supported databases, and network access. The application database stores WebReports settings and application records; it is separate from databases queried by your reports.
Existing Docker installation? Follow Update an Existing WebReports Docker Deployment below.
What You Are Setting Up
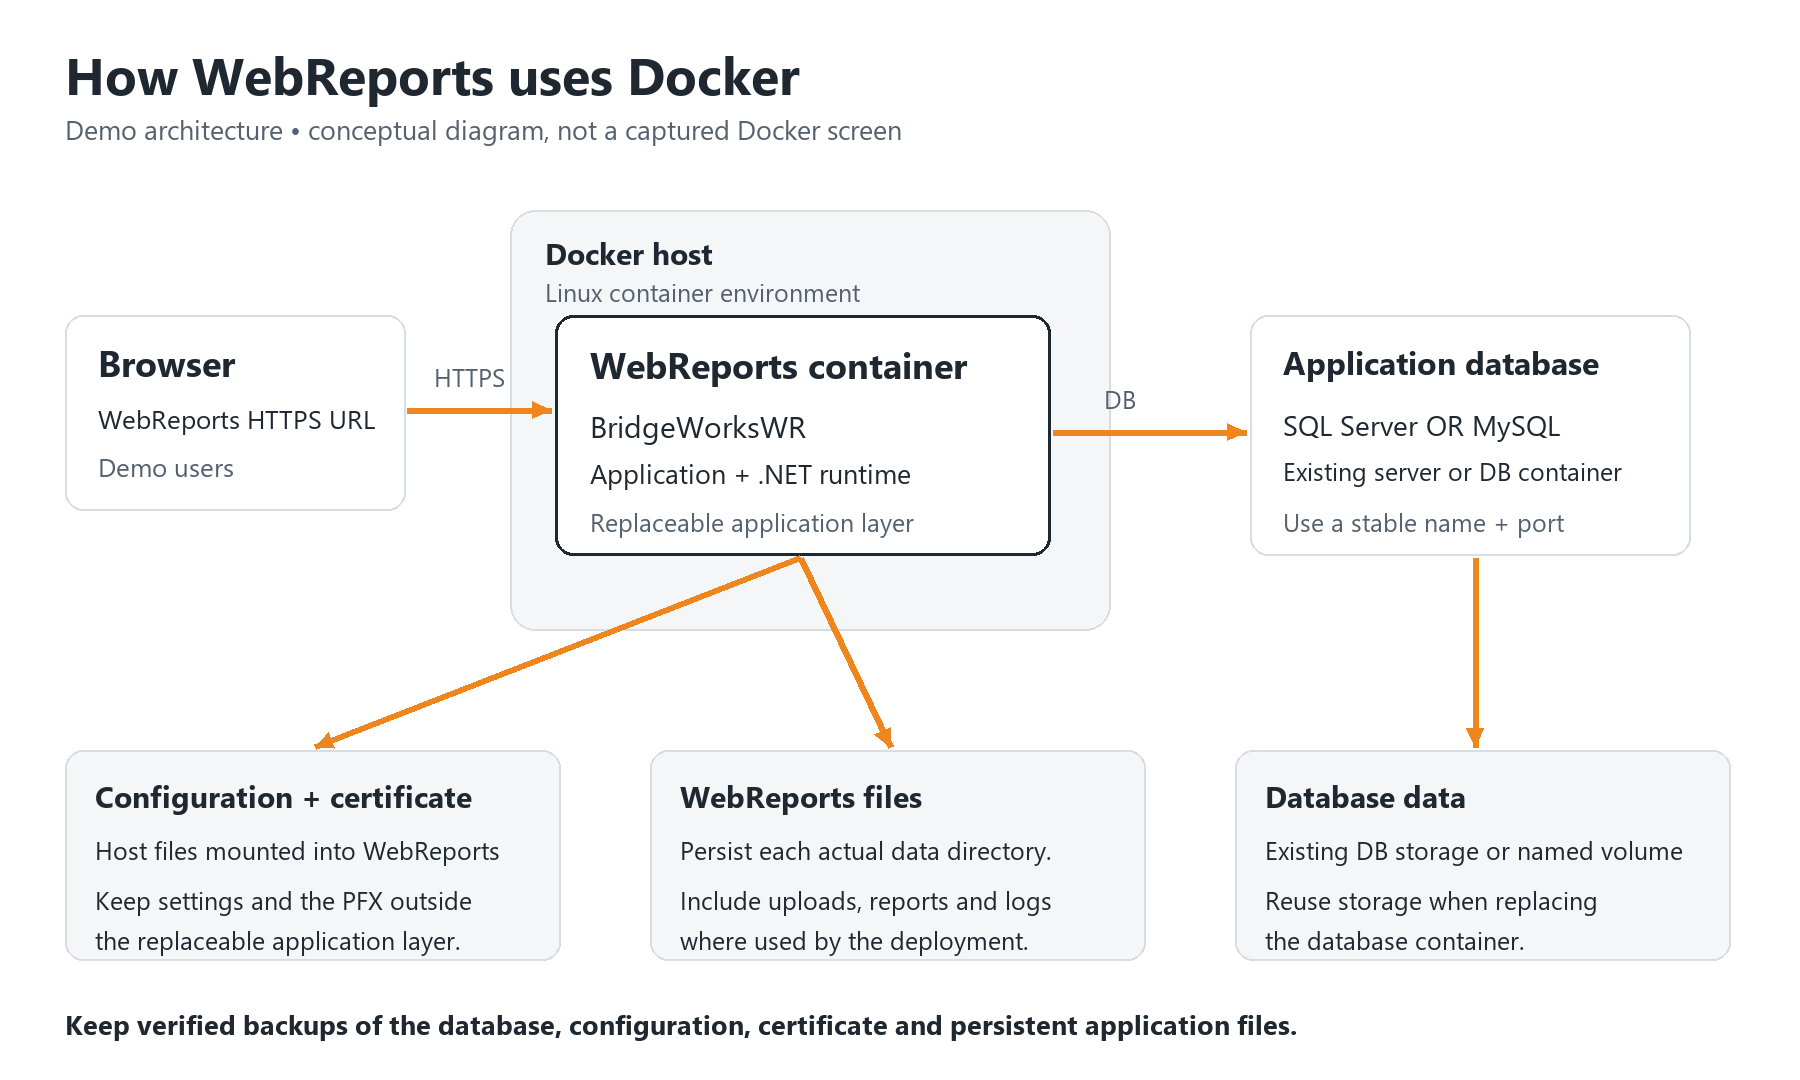
Conceptual demo diagram, not a Docker screen capture. The database can be an existing server or a separate container. Select the diagram to view it at full size.
Before You Begin
Alternative installation: This article covers Docker. For a Windows Server installation hosted by IIS, use Installing WebReports on Windows (IIS).
- Docker host: The example below uses PowerShell and Docker Desktop on a supported Windows desktop, with Linux containers. Docker Desktop is not supported on Windows Server; see Docker's Windows installation requirements. For a server deployment, have your administrator select a supported Linux Docker host and adapt the host paths and shell syntax. These commands use a local Docker daemon; bind-mount source paths belong to the daemon host.
-
Image platform: The versioned WebReports image used here is
linux/amd64. Confirm the host can run that platform. Microsoft also limits supported SQL Server Linux container hosts to Linux on Intel/AMD x86-64; review Microsoft's container support guidance before selecting a production database host. - Database: Prepare one supported SQL Server or MySQL application database and a dedicated application login. Use an existing server if available; a new database container is optional.
- HTTPS: Obtain a valid PFX certificate containing its private key, its password, and a certificate name matching the browser URL. Production clients must trust its issuing chain. A localhost development certificate is only for local testing; see Microsoft's Docker HTTPS guidance. IIS and the Windows Hosting Bundle are not required inside this Linux container; the image includes the runtime.
- Registration and integrations: Have the LicenseKey and CompanyID from your BridgeWorks subscription and registration information. Obtain WRXValue and other integration settings from your VDM/WebReports administrator where required.
Demo context: Use an isolated demo environment first. All names and paths below are demo values. Replace every <REPLACE_...> value before running its command or starting its container. Run command blocks in order in the same PowerShell session, and stop to resolve any error before continuing. Container and volume names must be unused for a new installation; use the update section for an existing installation.
Step 1: Prepare the Docker Host
Verify that both the Docker client and server are available and that Docker is using Linux containers:
docker version
docker info --format '{{.OSType}}/{{.Architecture}}'
Create the demo working directories on the Docker host:
$wrRoot = 'C:\Demo\WebReportsDocker'
New-Item -ItemType Directory -Force -Path "$wrRoot\config", "$wrRoot\https", "$wrRoot\secrets", "$wrRoot\reference" | Out-Null
docker network create webreports-demo
The user-defined network lets containers on it reach each other by name, such as wr-sql or wr-mysql. Do not copy an incidental container IP into the connection string; that IP can change. See Docker bridge networking.
Step 2: Prepare the Application Database
Choose one database option. If an existing supported database is ready, skip the container-creation commands and record its reachable DNS name, TCP port, database name, application login, and TLS requirements. Inside WebReports, localhost refers to the WebReports container. For a database on the Docker Desktop host, host.docker.internal can reach the host; this name is not a universal Linux-server endpoint.
Option A: SQL Server 2025 Express Demo Container
Create C:\Demo\WebReportsDocker\secrets\sql.env in a text editor with these lines. Save environment files as UTF-8 without a byte-order mark. Replace the password placeholder with a unique strong password meeting SQL Server policy; do not add quotes around values in these files.
ACCEPT_EULA=Y
MSSQL_PID=Express
MSSQL_SA_PASSWORD=<REPLACE_WITH_STRONG_SQL_ADMIN_PASSWORD>
This example explicitly selects Express. Confirm edition capacity and licensing for your workload. Review Microsoft's SQL Server environment settings and SQL Server container setup.
docker volume create webreports-demo-sql
docker run --name wr-sql --hostname wr-sql `
  --network webreports-demo --restart unless-stopped `
  --env-file "$wrRoot\secrets\sql.env" `
  --publish 127.0.0.1:14330:1433 `
  --mount type=volume,source=webreports-demo-sql,target=/var/opt/mssql `
  --detach mcr.microsoft.com/mssql/server:2025-latest
docker logs --tail 100 wr-sql
Wait for the database to be ready for client connections. From SSMS on the Docker host, connect to localhost,14330 using SQL Server Authentication and the administrator password you supplied. Create WebReportsDemo, create the dedicated webreports_demo login, and map it to that database with the WebReports database permissions described in Configuring WebReports SQL Server Using SSMS. Do not use sa as the WebReports application login.
WebReports connects across the Docker network to wr-sql,1433. Port 14330 is the host-side administration port, bound to host loopback in this demo.
Option B: MySQL 8.4 Demo Container
Create C:\Demo\WebReportsDocker\secrets\mysql.env with unique passwords:
MYSQL_ROOT_PASSWORD=<REPLACE_WITH_STRONG_MYSQL_ADMIN_PASSWORD>
MYSQL_DATABASE=WebReportsDemo
MYSQL_USER=webreports_demo
MYSQL_PASSWORD=<REPLACE_WITH_STRONG_MYSQL_APP_PASSWORD>
docker volume create webreports-demo-mysql
docker run --name wr-mysql --hostname wr-mysql `
--network webreports-demo --restart unless-stopped `
--env-file "$wrRoot\secrets\mysql.env" `
--publish 127.0.0.1:33060:3306 `
--mount type=volume,source=webreports-demo-mysql,target=/var/lib/mysql `
--detach mysql:8.4
docker logs --tail 100 wr-mysqlWait for initialization to finish and verify that the application login can access WebReportsDemo. These variables create the database and application user when initializing a new empty MySQL data volume; changing the file later does not reset an existing database or password. See the official MySQL image instructions.
WebReports uses wr-mysql, port 3306, across the Docker network. A database administration tool on the host uses localhost, port 33060. The named database volume retains database files when that database container is replaced; it still needs database backups.
Step 3: Pull the WebReports Image
Obtain the Configuration Template
The example below uses the published image matching WebReports release 2026.10.12.1, which includes .NET 10.0.13. It is a reproducible example, not a claim that it will remain the newest release.
$wrImage = 'bridgeworks/bridgeworksreportsweb:2026.10.12.1.AL3_Net1013'
docker pull $wrImage
docker image inspect $wrImage --format '{{.Os}}/{{.Architecture}}'
docker create --name WR-Template $wrImage
docker cp WR-Template:/app/appsettings.json "$wrRoot\config\appsettings.json"
docker create prepares a container without starting WebReports. docker cp can read from this stopped container, so no first launch is needed to obtain the template. Keep WR-Template stopped.
Image tags: The repository has versioned tags and a moving latest.AL tag. An untagged pull means :latest, which was not present when this guide was reviewed. Choose an available release tag from the WebReports image tags and its release notes. Record the selected image ID/digest for deployment and rollback.
Step 4: Configure WebReports
Edit C:\Demo\WebReportsDocker\config\appsettings.json. Keep the full template and update the relevant properties; the examples below are partial configuration fragments, not complete replacement files. Use one active ConnectionStrings.DefaultConnection and the matching DatabaseType.
| Setting | Where the Value Comes From |
|---|---|
ConnectionStrings.DefaultConnection |
The database endpoint, TCP port, database, dedicated application login and password prepared above or supplied by your DBA. |
DatabaseType |
Use MSSQL for SQL Server or MYSQL for MySQL. |
Registration.LicenseKey and Registration.CompanyID
|
Your BridgeWorks subscription and registration information form; request these from your organization’s license administrator or BridgeWorks Support. |
WRXValue / WRXCompanyIDs and authentication settings |
Your existing approved VDM/integration and sign-in configuration, where used. See Configure IIS and Deploy WebReports for the configuration-setting explanations; the IIS steps do not apply to this container. |
SQL Server demo fragment:
{
  "ConnectionStrings": {
    "DefaultConnection": "Server=wr-sql,1433;Database=WebReportsDemo;User Id=webreports_demo;Password=<REPLACE_WITH_SQL_APP_PASSWORD>;Encrypt=Yes;TrustServerCertificate=Yes;Connect Timeout=60"
  },
  "DatabaseType": "MSSQL"
}
SQL TLS choice: This isolated demo fragment uses TrustServerCertificate=Yes for an untrusted/self-signed SQL certificate. It encrypts traffic but bypasses certificate validation. For production, configure a trusted SQL certificate, a server name matching that certificate, and trust inside the WebReports container; use Encrypt=Yes;TrustServerCertificate=False. The browser's PFX does not configure SQL Server TLS. See Microsoft's SQL TLS guidance.
MySQL fragment:
{
  "ConnectionStrings": {
    "DefaultConnection": "server=wr-mysql;port=3306;user=webreports_demo;password=<REPLACE_WITH_MYSQL_APP_PASSWORD>;database=WebReportsDemo;connect timeout=60;Pooling=False"
  },
  "DatabaseType": "MYSQL"
}
Use a separate port=3306 option for MySQL. Configure and verify MySQL TLS and certificate validation according to your database policy before production use; this basic fragment does not establish that policy. See MySQL connection options.
Registration fragment:
{
  "Registration": {
    "LicenseKey": "<REPLACE_WITH_BRIDGEWORKS_LICENSE_KEY>",
    "CompanyID": "<REPLACE_WITH_COMPANY_ID>"
  }
}
Preserve valid JSON quoting and commas. Escape a literal backslash as \\ inside a JSON string. For example, a SQL instance written as SERVER\INSTANCE becomes SERVER\\INSTANCE in JSON. Quotes and backslashes in passwords need JSON escaping as well as any connection-string quoting required by the database provider.
InterSystems IRIS/Caché connections: ResolveIP is still present in the image template, but do not apply a .NET 5/6 workaround automatically to this .NET 10 image. Preserve the approved setting for an existing deployment and confirm the setting with BridgeWorks Support for the current driver and connection profile if a hostname fails to resolve.
Step 5: Prepare HTTPS and Persistent Storage
Place the approved PFX at C:\Demo\WebReportsDocker\https\webreports-demo.pfx, or substitute its actual filename consistently. Create C:\Demo\WebReportsDocker\secrets\webreports.env with:
ASPNETCORE_URLS=https://+:443
ASPNETCORE_Kestrel__Certificates__Default__Path=/https/webreports-demo.pfx
ASPNETCORE_Kestrel__Certificates__Default__Password=<REPLACE_WITH_PFX_PASSWORD>
The password must match the PFX. Protect the configuration, certificate, and environment files: they contain credentials or private keys. An environment file avoids placing the literal password in the command example, but its values remain visible to administrators who can inspect the container.
| Resource | How It Is Retained |
|---|---|
| Configuration | The example bind-mounts the prepared host file at /app/appsettings.json. It is writable because WebReports configuration changes may need to be saved. Verify that your deployment can save settings and that the host file receives those changes. |
| HTTPS certificate | The host https folder is mounted read-only at /https. The container certificate path refers to this mounted folder, not the Windows host path. |
| Application database | Use the existing database server’s storage, or the named SQL/MySQL volume created above. Back it up using database-aware procedures. |
| WebReports application files | Before production use, identify every actual data directory used for generated/stored reports, uploads, custom branding, logs and other required files. Add a bind mount or named volume for each confirmed container path; seed any required initial files and verify write access. These paths vary by deployment. Ask BridgeWorks Support if a path is unknown. |
Mount only the intended data paths. Mounting an empty host directory over /app hides the application supplied by the image. Likewise, do not cover the whole static-assets directory with an empty mount. See Docker bind mounts and volumes.
Step 6: Create the WebReports Container
Confirm that the configuration file and certificate file exist before creating the container:
Test-Path -LiteralPath "$wrRoot\config\appsettings.json" -PathType Leaf
Test-Path -LiteralPath "$wrRoot\https\webreports-demo.pfx" -PathType Leaf
Test-Path -LiteralPath "$wrRoot\secrets\webreports.env" -PathType Leaf
All three checks must return True, all placeholders must be replaced, and the selected database must be ready. Then create the container. Add the application-data mounts identified above to this command before a production deployment; the base example below supplies configuration and HTTPS only.
docker create --name BridgeWorksWR `
  --network webreports-demo `
  --publish 127.0.0.1:8443:443 `
  --env-file "$wrRoot\secrets\webreports.env" `
  --mount "type=bind,source=$wrRoot\config\appsettings.json,target=/app/appsettings.json" `
  --mount "type=bind,source=$wrRoot\https,target=/https,readonly" `
  $wrImage
127.0.0.1:8443:443 maps host loopback port 8443 to HTTPS port 443 inside the container for a local test. Browse to https://localhost:8443 only if the test certificate is valid for localhost. Other computers cannot reach this loopback binding. For shared hosting, use the administrator-approved host interface/port, firewall rules, DNS name and matching certificate; for example, users may browse to https://webreports.demo.example.com after that environment is configured.
The WebReports and optional database containers must share webreports-demo for these container names to resolve. Use your organization's DNS configuration for external services; a public DNS override such as 8.8.8.8 is not a general installation requirement.
Step 7: Start and Verify WebReports
docker start BridgeWorksWR
docker ps -a
docker logs --tail 100 BridgeWorksWR
A container shown as running is only the first check. Open the configured HTTPS URL, confirm certificate trust, sign in/register as required, and verify the expected release, database connectivity, a representative report, stored files, configuration saving, and scheduling where used. Verify that files intended to persist appear in the storage you recorded. After those checks, an administrator can set the intended restart policy:
docker update --restart unless-stopped BridgeWorksWRIf startup fails, check the selected image/tag, platform, JSON, database readiness and credentials, network name, mount permissions, PFX filename/password and port availability. Inspect stopped containers with docker ps -a; docker ps alone omits them. See Troubleshooting Docker Startup. Avoid sharing unredacted logs, environment files or inspection output.
Update an Existing WebReports Docker Deployment
An image update requires a replacement container. Pulling an image and restarting the existing container does not change the image that created it. Use the release notes for the chosen available tag, and test the update in a non-production environment first. Do not recreate the application database container as part of this application update.
The examples use the existing application container name BridgeWorksWR. Keep its real options and paths rather than replacing them with the local-test values above.
Step 1: Record the Deployment and Prepare Backups
Plan a maintenance window. Create a new, restricted backup directory for this upgrade; the example date is not a reusable backup target:
$wrUpgrade = 'C:\Demo\Backups\WebReports\2026-10-27-before-update'
New-Item -ItemType Directory -Path $wrUpgrade | Out-Null
docker inspect BridgeWorksWR | Out-File -FilePath "$wrUpgrade\container-inspect.json" -Encoding utf8
docker inspect BridgeWorksWR --format '{{.Image}}'
docker inspect BridgeWorksWR --format '{{json .Mounts}}'
Record the image ID, original create/Compose definition, ports, environment files and variables, certificate, every bind mount and named/anonymous volume, networks, DNS settings, restart policy, and custom options. Inspection output may contain credentials. Identify all persistent files and the application database, and prepare verified backups. Retain the old container, old image and all volumes throughout the update.
Step 2: Pull the Chosen Release Image
Replace the tag below with the approved target release if different. This explicit example matches release 2026.10.12.1; do not assume :latest exists or that a moving tag identifies a fixed version.
$wrTargetImage = 'bridgeworks/bridgeworksreportsweb:2026.10.12.1.AL3_Net1013'
docker pull $wrTargetImage
docker image inspect $wrTargetImage --format '{{.Id}}'
Wait for a successful pull and confirm platform/release compatibility before stopping the existing service. Save the new image's configuration template from a separate stopped template container for comparison; use an unused name.
docker create --name WR-UpgradeTemplate $wrTargetImage
docker cp WR-UpgradeTemplate:/app/appsettings.json "$wrUpgrade\appsettings.new.json"
Step 3: Stop and Retain the Current Container
docker stop BridgeWorksWR
docker cp BridgeWorksWR:/app/appsettings.json "$wrUpgrade\appsettings.json"
Back up the active configuration source as well: if it is mounted from a host file/volume, back up that source; if it is inside the old container, the copy above preserves it. Complete database-aware backups and consistent backups of application storage with writers stopped or coordinated. Copy any required files stored only inside the container using their actual paths. Confirm backups are usable before proceeding.
Choose an unused backup name and retain the stopped container:
docker rename BridgeWorksWR BridgeWorksWR-before-upgradeStep 4: Create the Replacement Without Starting It
Use docker create with $wrTargetImage and all recorded existing deployment options. For example, reuse the original port binding, certificate mount, environment source, network and persistent-data mounts. Reuse existing named volumes by name, including recorded anonymous-volume names where applicable. Do not create empty replacement storage or change the database endpoint.
The create command in the new-install section is a starting point only for a deployment that actually uses those same paths and options. Keep the production deployment definition with the backup so this step is repeatable.
Step 5: Restore Configuration and Application Data
Compare the new template with the saved configuration. Apply settings required by the release notes while preserving the database connection, LicenseKey, CompanyID, WRXValue, authentication and other environment settings.
For a mounted configuration, update the backed-up host/volume source before starting the replacement. For configuration stored inside the container, copy the prepared full file into the new stopped container:
docker cp "$wrUpgrade\appsettings.json" BridgeWorksWR:/app/appsettings.jsonRestore any data previously held only in the old container into the corresponding data paths and verify access. Restore data folders only; retain the application binaries/static assets supplied by the new image. Mounts retain storage, but they do not provide a point-in-time backup or protect shared files from changes made by the new version.
Step 6: Start and Verify WebReports
docker start BridgeWorksWR
docker logs --tail 100 BridgeWorksWR
docker ps -a
Verify the expected WebReports version, certificate, sign-in, registration, database access, report execution, stored files, configuration changes and scheduled processing used by the deployment. Keep the previous container, image and backups until the update has been verified.
If You Need to Roll Back
Use unused retained-container names. Stop the replacement and retain it before returning the old container to its original name:
docker stop BridgeWorksWR
docker rename BridgeWorksWR BridgeWorksWR-upgrade-failed
docker rename BridgeWorksWR-before-upgrade BridgeWorksWR
Before restarting the old container: check whether the update changed the shared database, mounted configuration, application files or other shared storage. Renaming containers does not reverse these changes. Restore the corresponding backups when required, and contact BridgeWorks Support if compatibility is uncertain. Then start the original container:
docker start BridgeWorksWRVerify that the previous deployment works before ending the maintenance window.
Comments
0 comments
Please sign in to leave a comment.